Good patterns for pipelines using Terraform
Everyone agrees Terraform belongs in a pipeline. Few agree on how to set it up well.
Every company wants reproducible, auditable infrastructure deployments — but getting started the right way is harder than it sounds. You can split your code into small Terraform modules, keep everything in one monolithic module, or use Terragrunt on top. AI can generate pipelines, but it rarely follows the best practices consistently. What is the good way? This tutorial shows one approach that works: OIDC-based pipelines with no stored secrets, plan-before-apply, and environment separation.
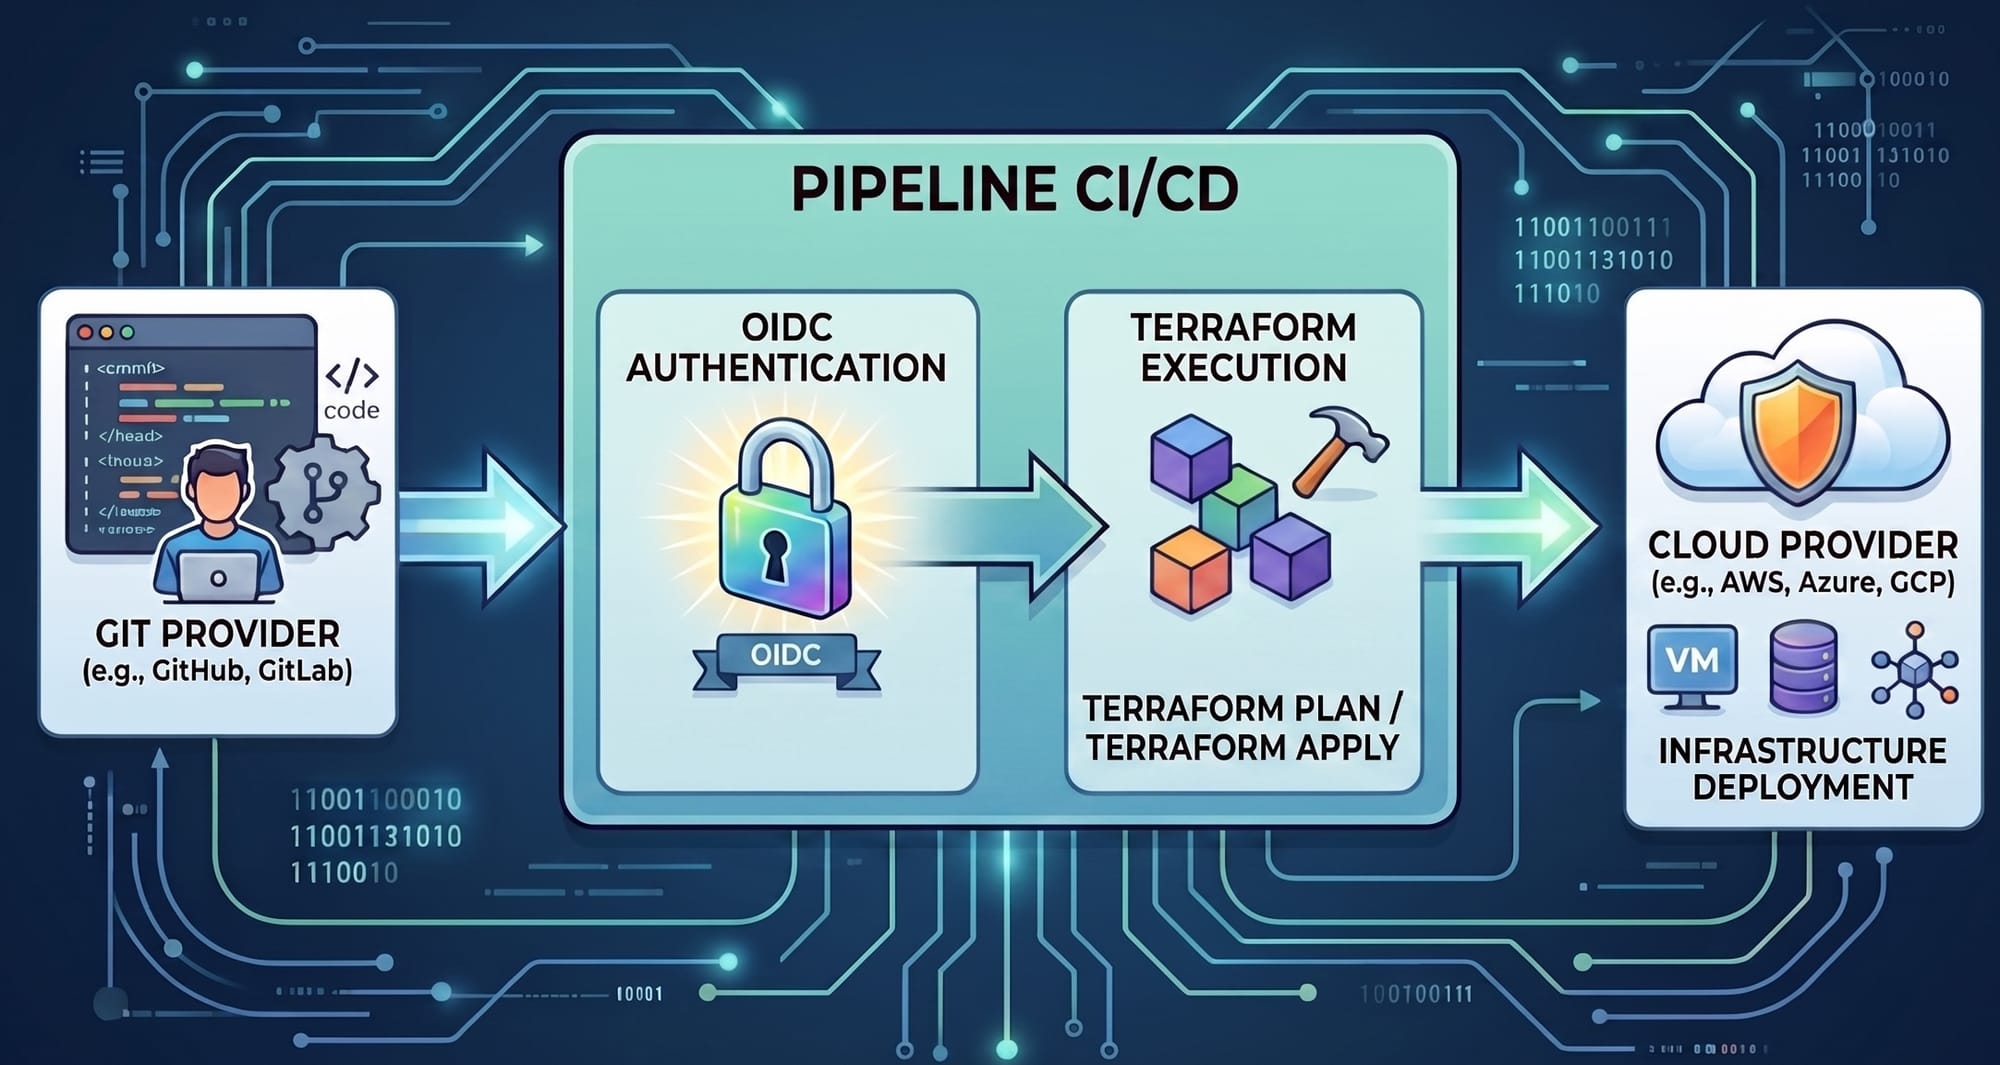
This tutorial uses OIDC (OpenID Connect) to connect the pipeline to the cloud. Instead of storing API keys as secrets, the pipeline proves its identity and receives short-lived credentials that expire when the job finishes. OIDC works across providers: GitHub, GitLab, and Bitbucket can authenticate against AWS, GCP, and Azure using the same protocol.
Once authenticated, the pipeline assumes a cloud-native role — an IAM Role in AWS, a Service Account via Workload Identity Federation in GCP, or a Federated Identity Credential in Azure. This role defines what the pipeline can do in your cloud account.
Our system supports GitHub or GitLab as git providers, and AWS, GCP, or Azure as cloud targets. This tutorial walks through GitHub + AWS step by step. The same OIDC pattern applies to the other combinations. See the GitHub + AWS template for a working example, or the pipeline scaffold tool that generates these templates for any provider combination.
Pipelines are usually kept private because they contain secrets and internal configuration. With OIDC, there are no stored secrets in the pipeline itself — which means you can safely open-source your workflow files. That is exactly what we do with our template repository.
What are the benefits of this approach? Reproducible deployments, consistent environments, full audit trail, and faster incident response. The setup is also AI-agent friendly — agents can read your Terraform code and pipeline configuration to understand your cloud architecture, propose changes, and flag opportunities in security and cost optimization.
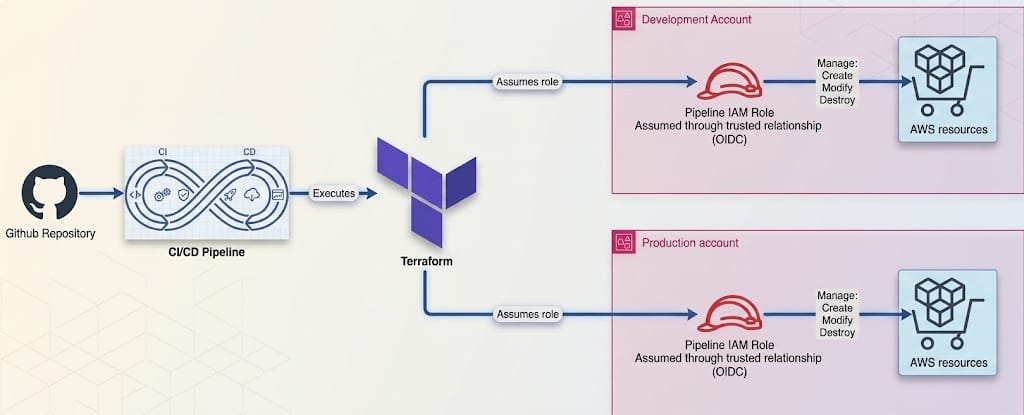
The diagram above shows the recommended architecture. A developer commits infrastructure code to a branch. The pipeline uses OIDC to authenticate against the cloud provider and assumes an IAM role. That role grants permissions to deploy resources in a specific AWS account. The IAM role assumed is determined by the Git environment — commits to develop trigger the development environment and its corresponding role, while commits to main trigger the production environment. This allows you to manage multiple cloud environments (development, production) through Git branching alone, using different IAM roles with different permissions per account.
Prerequisites
Before you start, make sure you have:
- An AWS account with permissions to create IAM roles and identity providers
- A GitHub repository (or organization) where your Terraform code will live
- Terraform installed locally — optional, useful for writing and testing your
.tffiles before pushing - GitHub CLI (
gh) — optional, useful for retrieving repository IDs
Tutorial: Setting up the pipeline
Let's do a short dive into how to set this up using Github and AWS. In order to achieve this you will need to:
On AWS:
- Set Github as an Identity Provider
- Create an IAM Role with a Trust Relationship specifying a Github organization/repo as a trusted audience.
On Github:
- Have one repo/organization where the IAM Role will be assumed from
- Set the secrets depending on the environment
We show the manual steps here. You can automate them with the CLI or Terraform once you understand what each one does.
Step 1: Set up Github as an Identity Provider in AWS
Go to the AWS Console. Navigate to IAM > Identity providers > Add provider. Select "OpenID Connect" as the provider type.
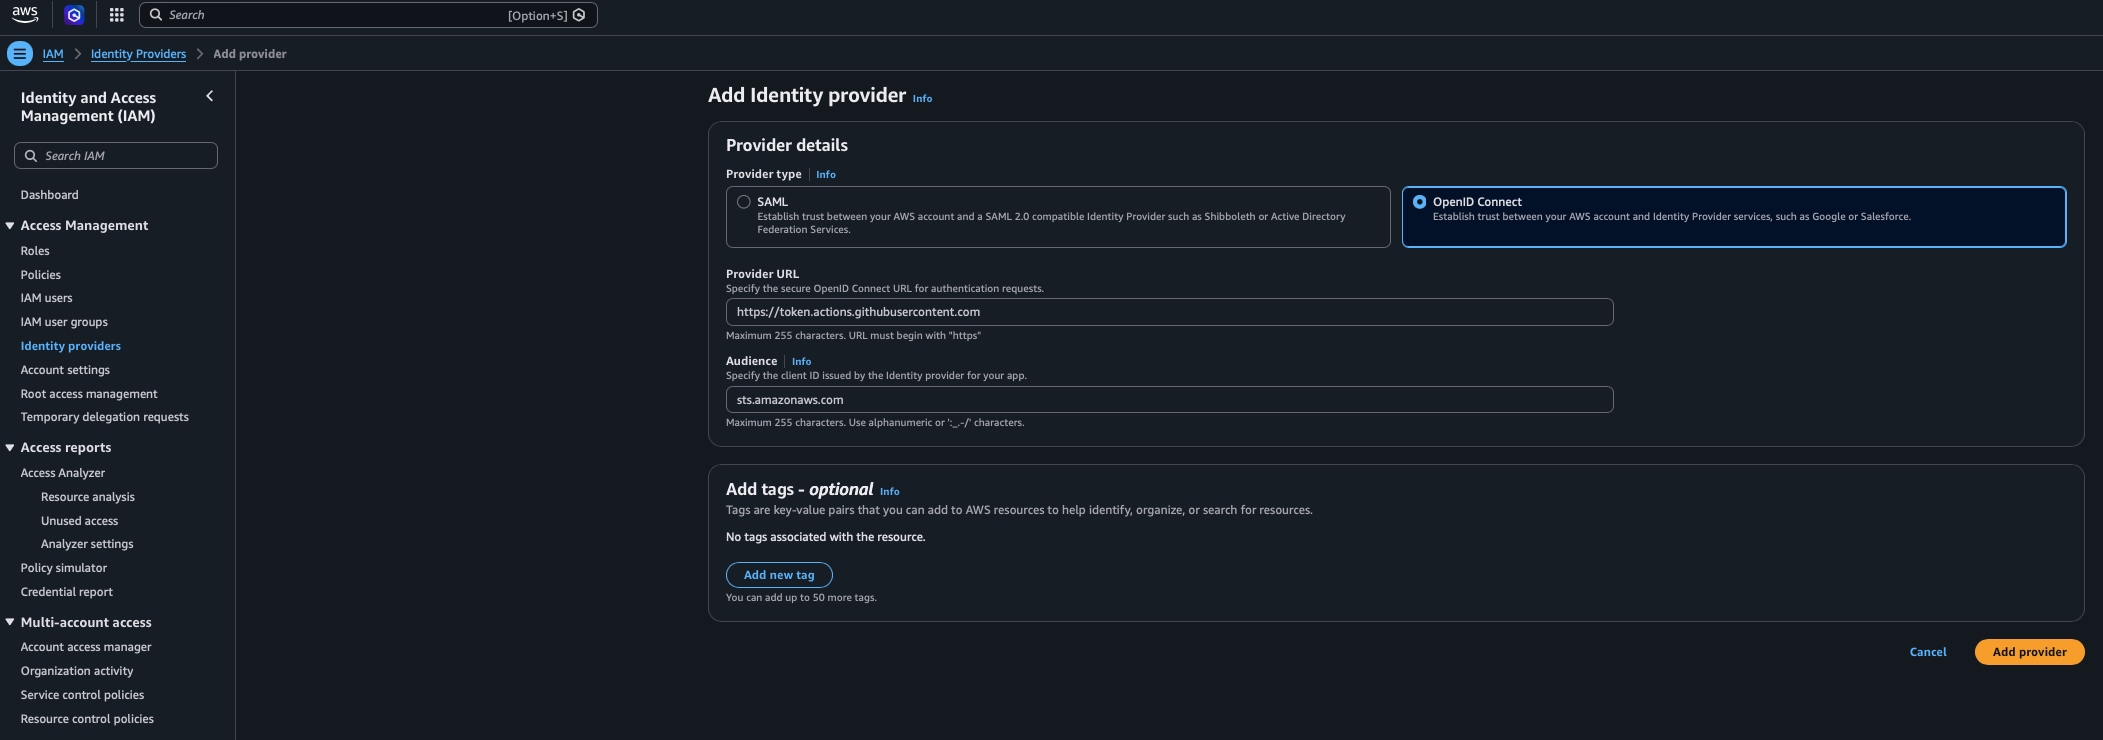
- For the provider URL: Use https://token.actions.githubusercontent.com
- For the "Audience": Use sts.amazonaws.com if you are using the official action.
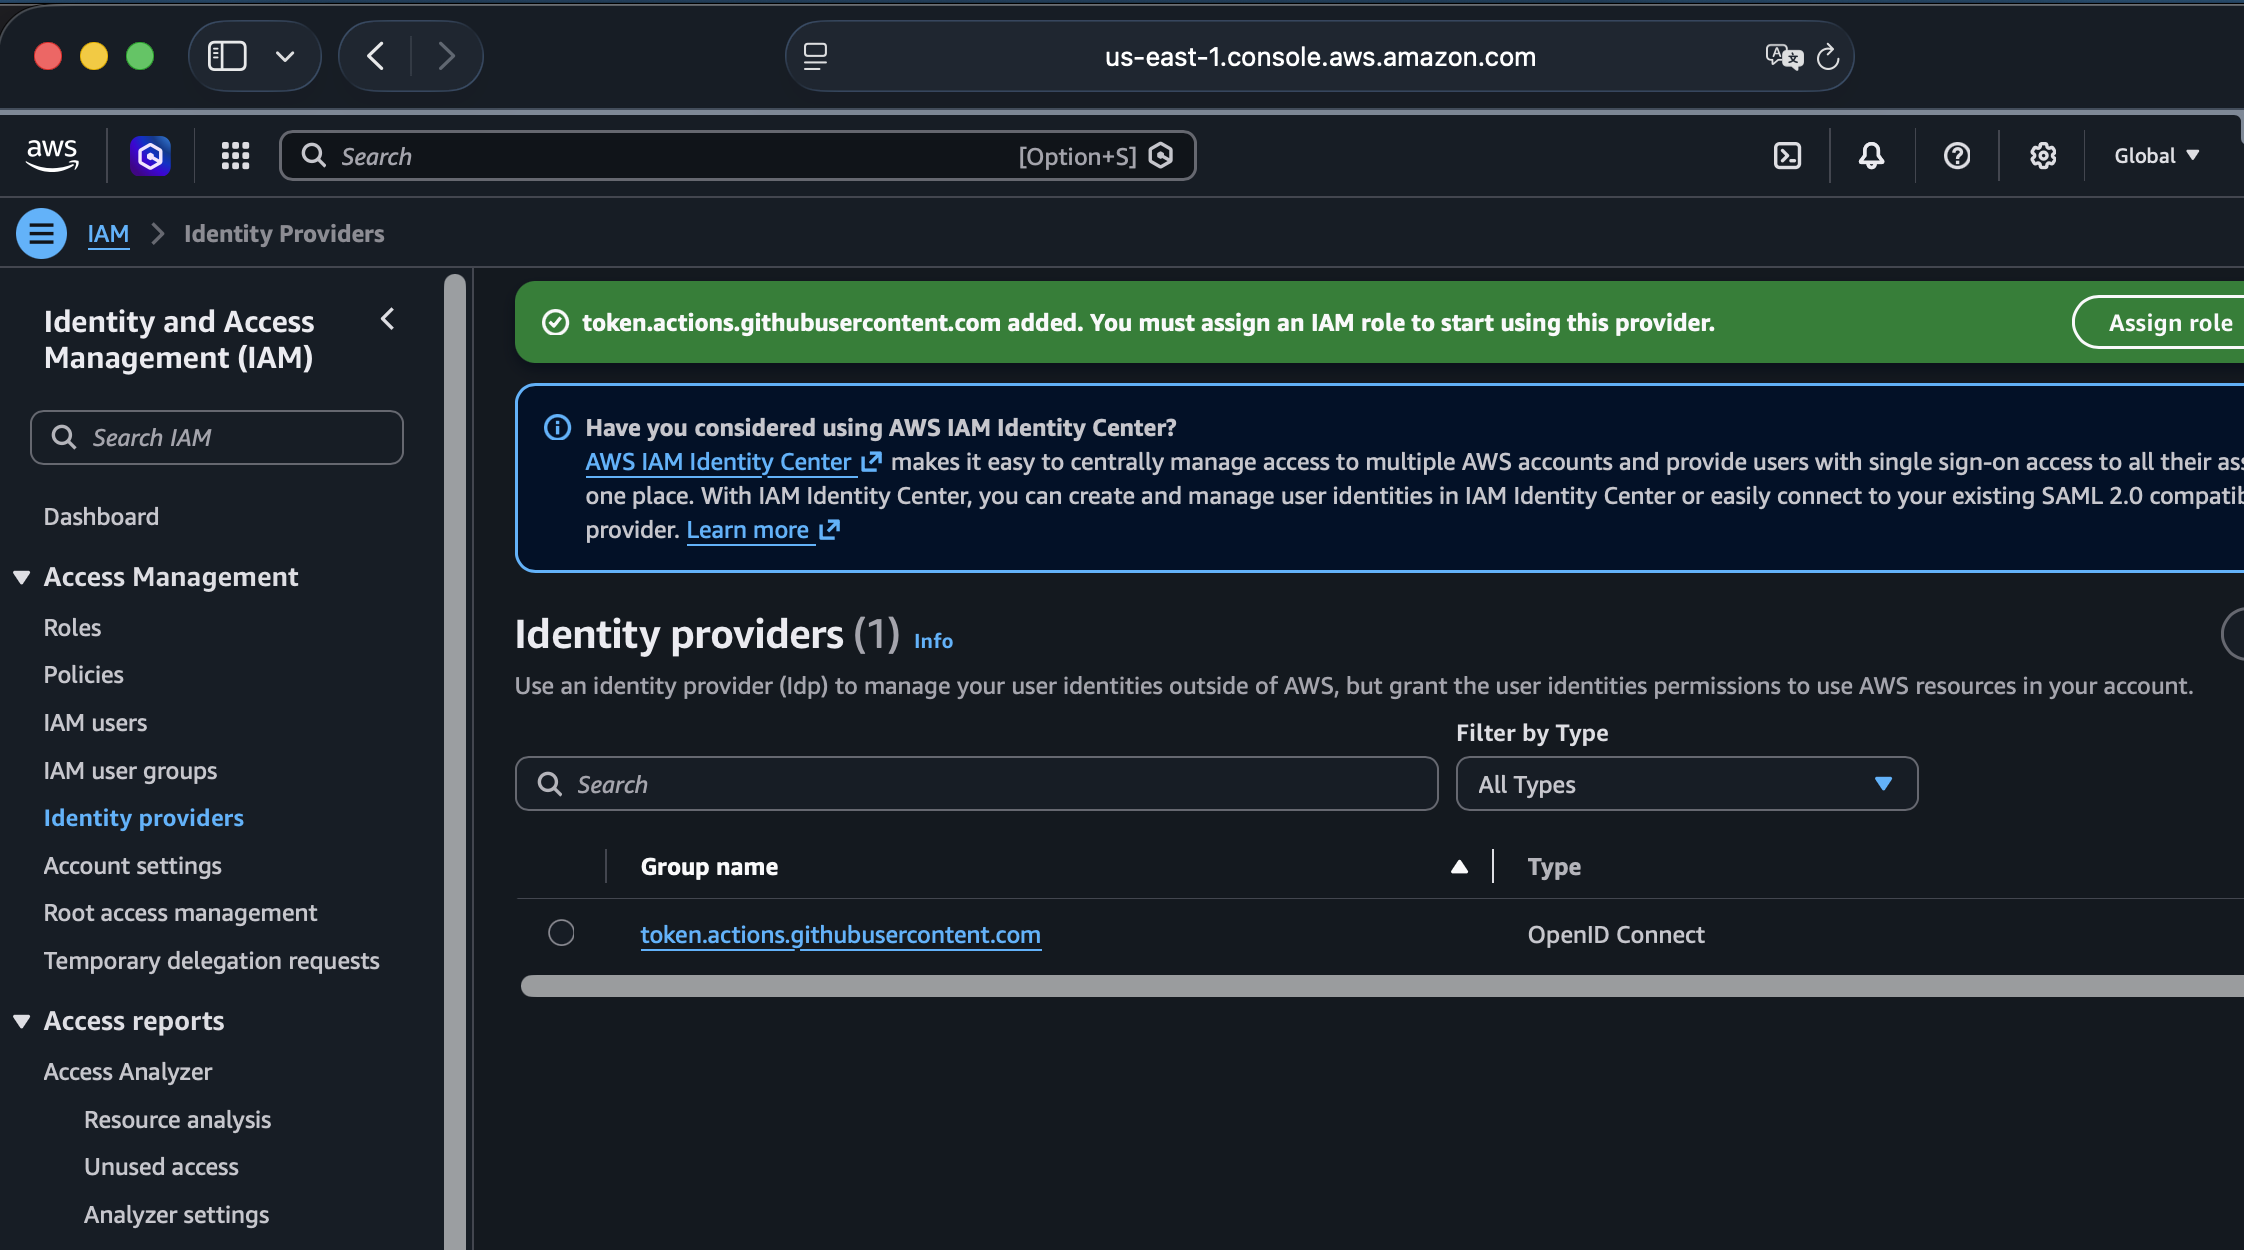
You should be able to see this in Identity Providers:
Step 2: Create an IAM Role in AWS with a trust relationship
Go to IAM > Roles > Create role. Select "Web identity" as the trusted entity type. Choose the identity provider you created in Step 1 (token.actions.githubusercontent.com) and set the audience to sts.amazonaws.com.
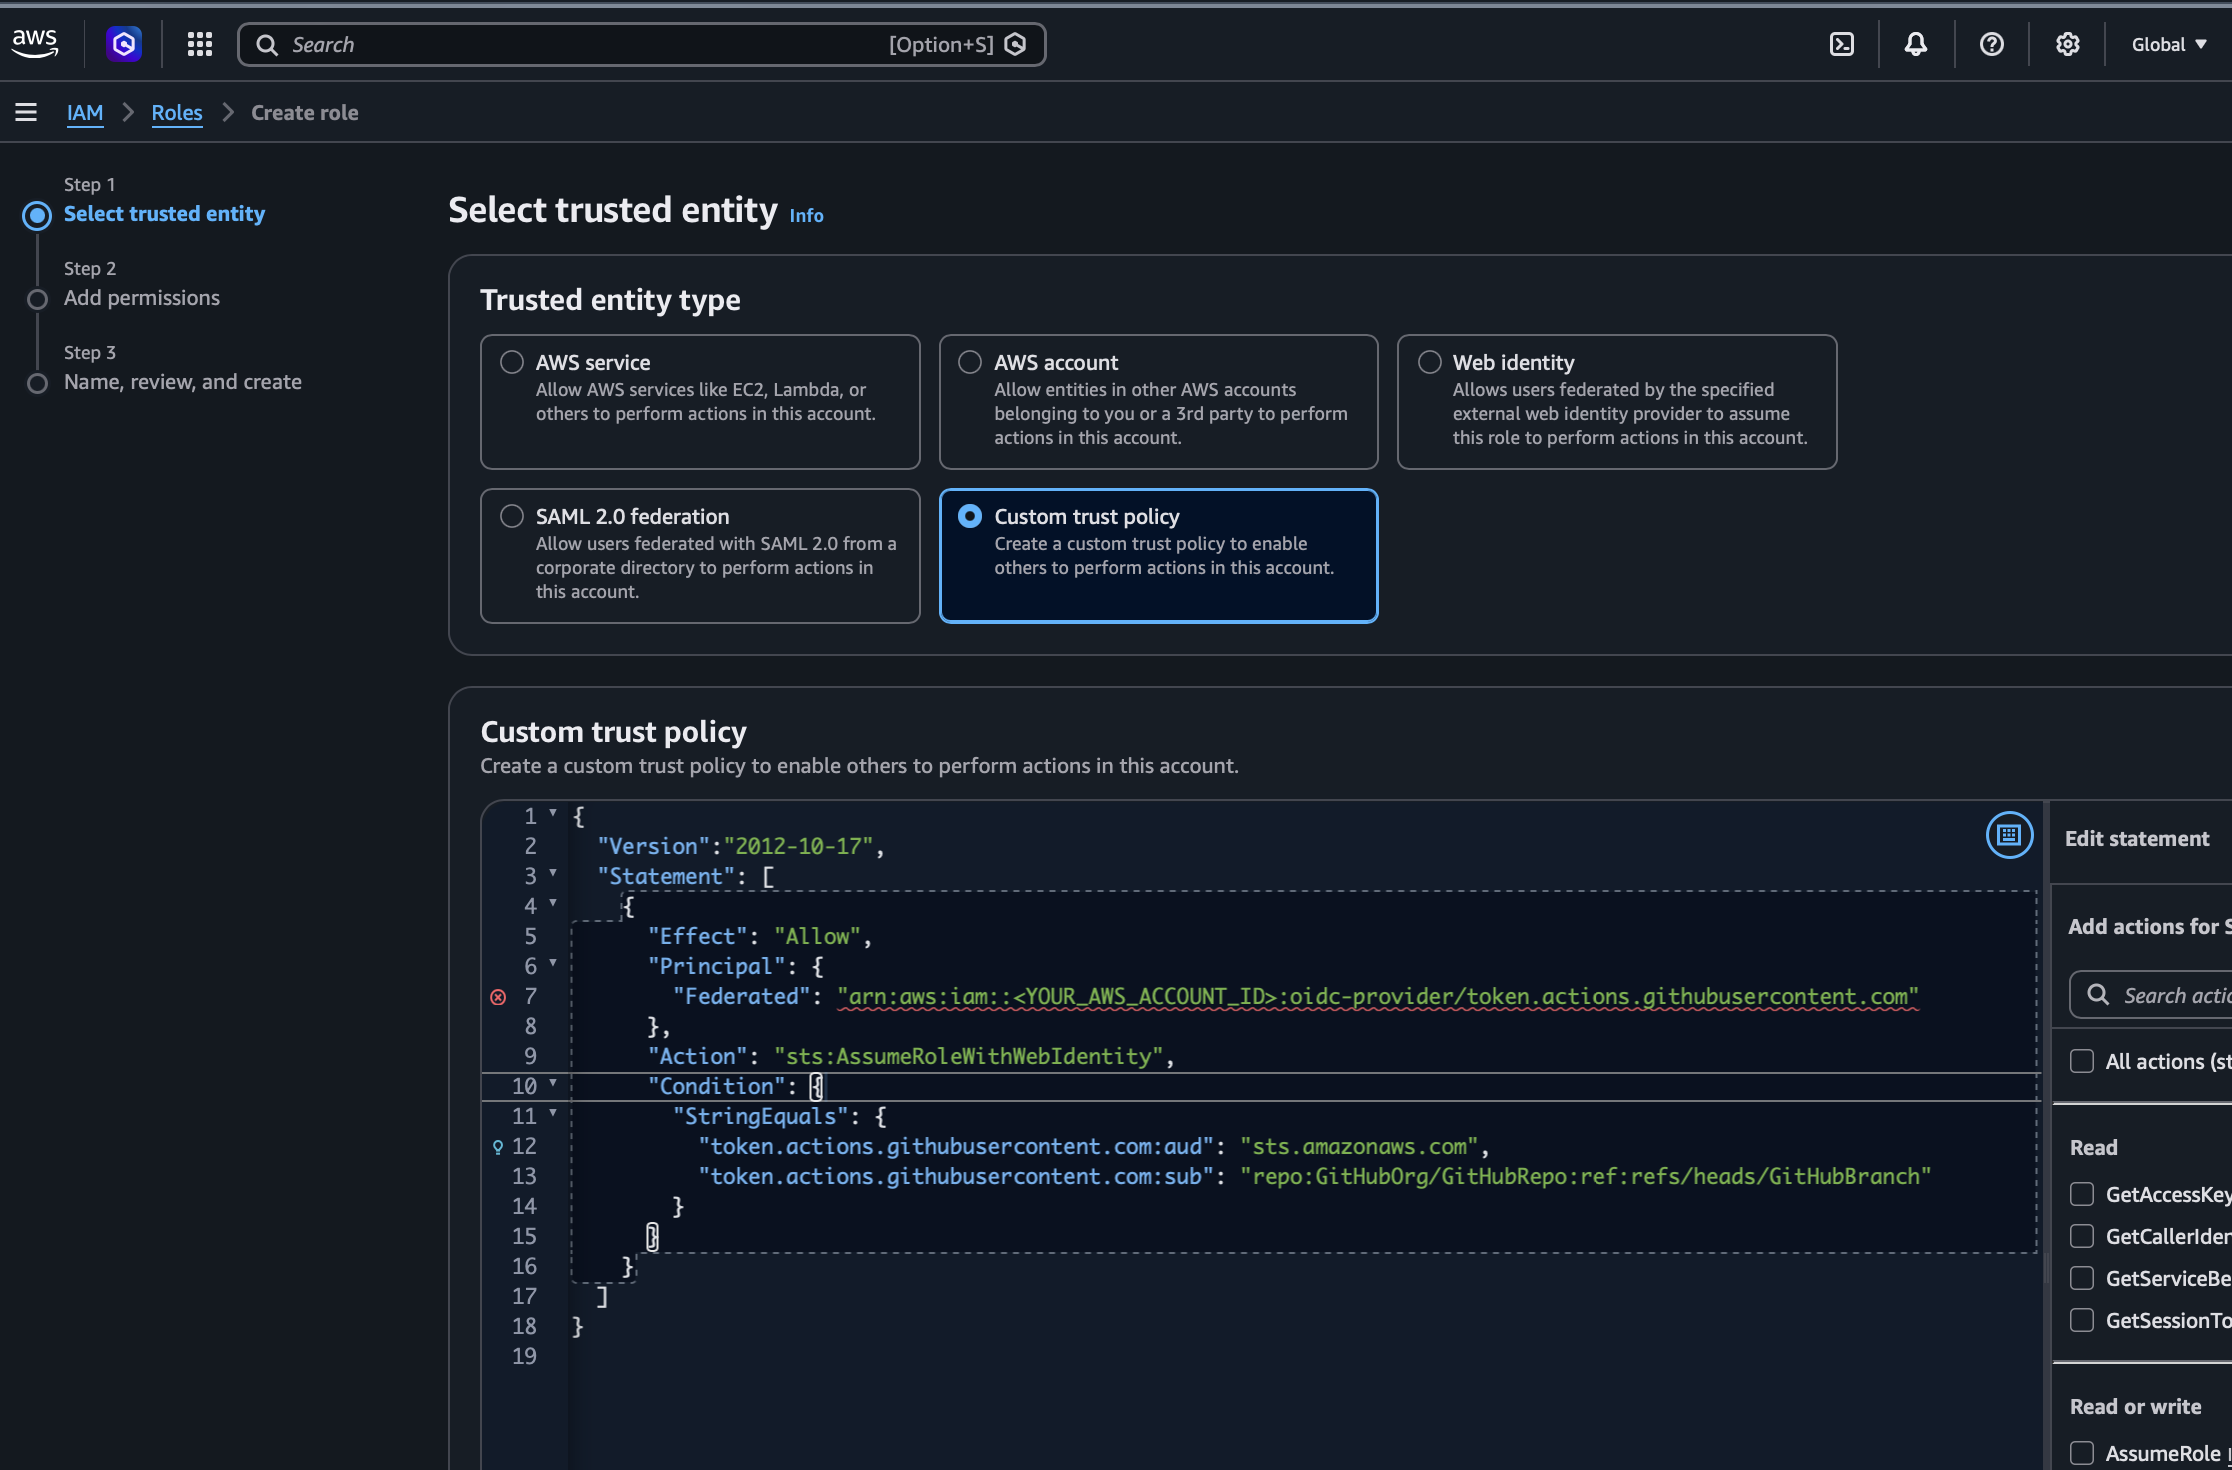
On the next screen, AWS generates a trust policy. Edit it to restrict which repositories can assume this role. The trust policy should look like this:
{
  "Version": "2012-10-17",
  "Statement": [
    {
      "Effect": "Allow",
      "Principal": {
        "Federated": "arn:aws:iam::YOUR_AWS_ACCOUNT_ID:oidc-provider/token.actions.githubusercontent.com"
      },
      "Action": "sts:AssumeRoleWithWebIdentity",
      "Condition": {
        "StringEquals": {
          "token.actions.githubusercontent.com:aud": "sts.amazonaws.com"
        },
        "StringLike": {
          "token.actions.githubusercontent.com:sub": "repo:YourOrg@123456/YourRepo@789012:*"
        }
      }
    }
  ]
}
Note: Since July 15, 2026, GitHub uses an immutable
subclaim format that appends numeric owner and repository IDs (repo:owner@OWNER_ID/repo@REPO_ID:...). This prevents identity spoofing when a repository is renamed or transferred. The previous format (repo:owner/repo:...) still works for older repositories that have not opted in, but all new repositories (or renamed ones) use the immutable format by default. See the GitHub OIDC reference for details.
You can retrieve your owner and repository IDs with:
gh api repos/YourOrg/YourRepo \
  --jq '{owner_id: (.organization.id // .owner.id), repo_id: .id}'
If you don't have a Github organization, you can use your Github username. Note that we use "StringLike" in the condition, not "StringEquals", so the wildcard * matches any branch or environment.
To scope the trust to a single repository (all branches and environments), use the immutable format with your repo ID:
"Condition": {
    "StringEquals": {
        "token.actions.githubusercontent.com:aud": "sts.amazonaws.com"
    },
    "StringLike": {
        "token.actions.githubusercontent.com:sub": "repo:YourUsername@123456/YourRepo@789012:*"
    }
}
To allow all repositories in your organization:
"Condition": {
    "StringEquals": {
        "token.actions.githubusercontent.com:aud": "sts.amazonaws.com"
    },
    "StringLike": {
        "token.actions.githubusercontent.com:sub": "repo:YourGitHubOrg@123456/*"
    }
}
Next, attach permissions to the role. In this example we use AdministratorAccess — permissive, but acceptable for a single-repo pipeline that manages broad infrastructure. As your team or scope grows, narrow the permissions with explicit Deny statements or apply Least Privilege.
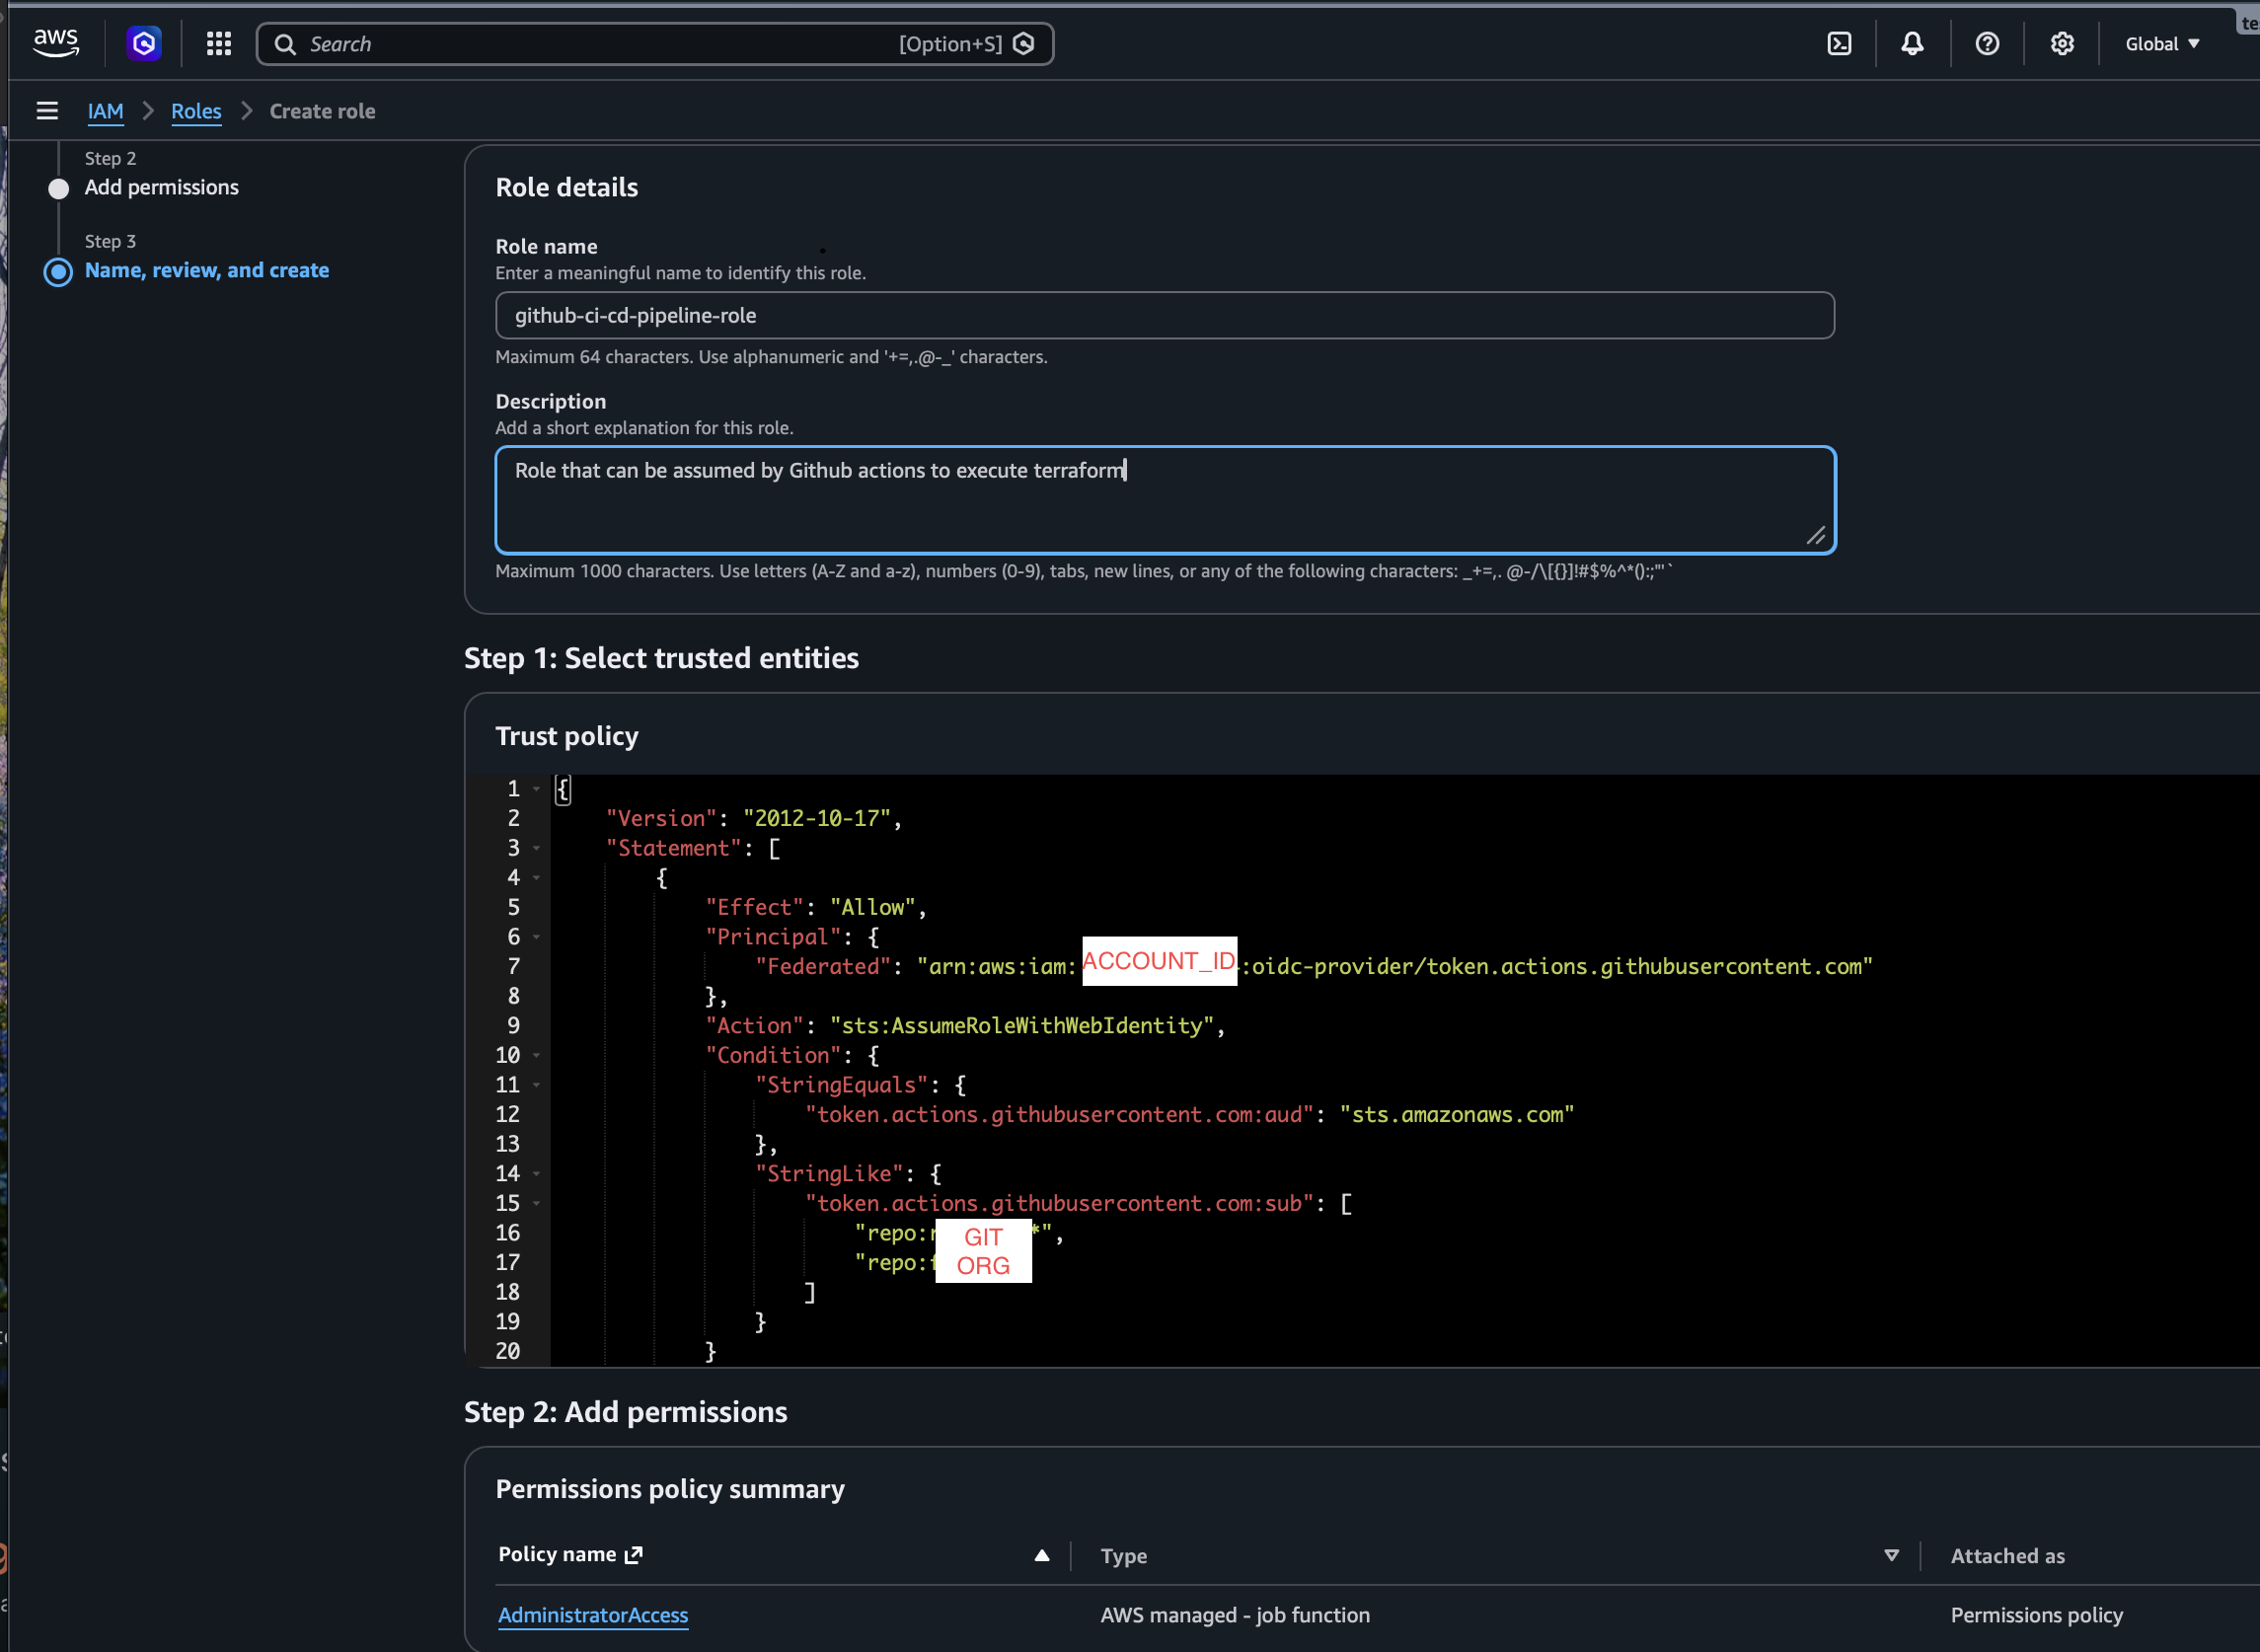
You are now ready with the setup on AWS. Copy and paste that IAM role's ARN somewhere, you will need it soon.
Step 3: Configure GitHub environments and variables
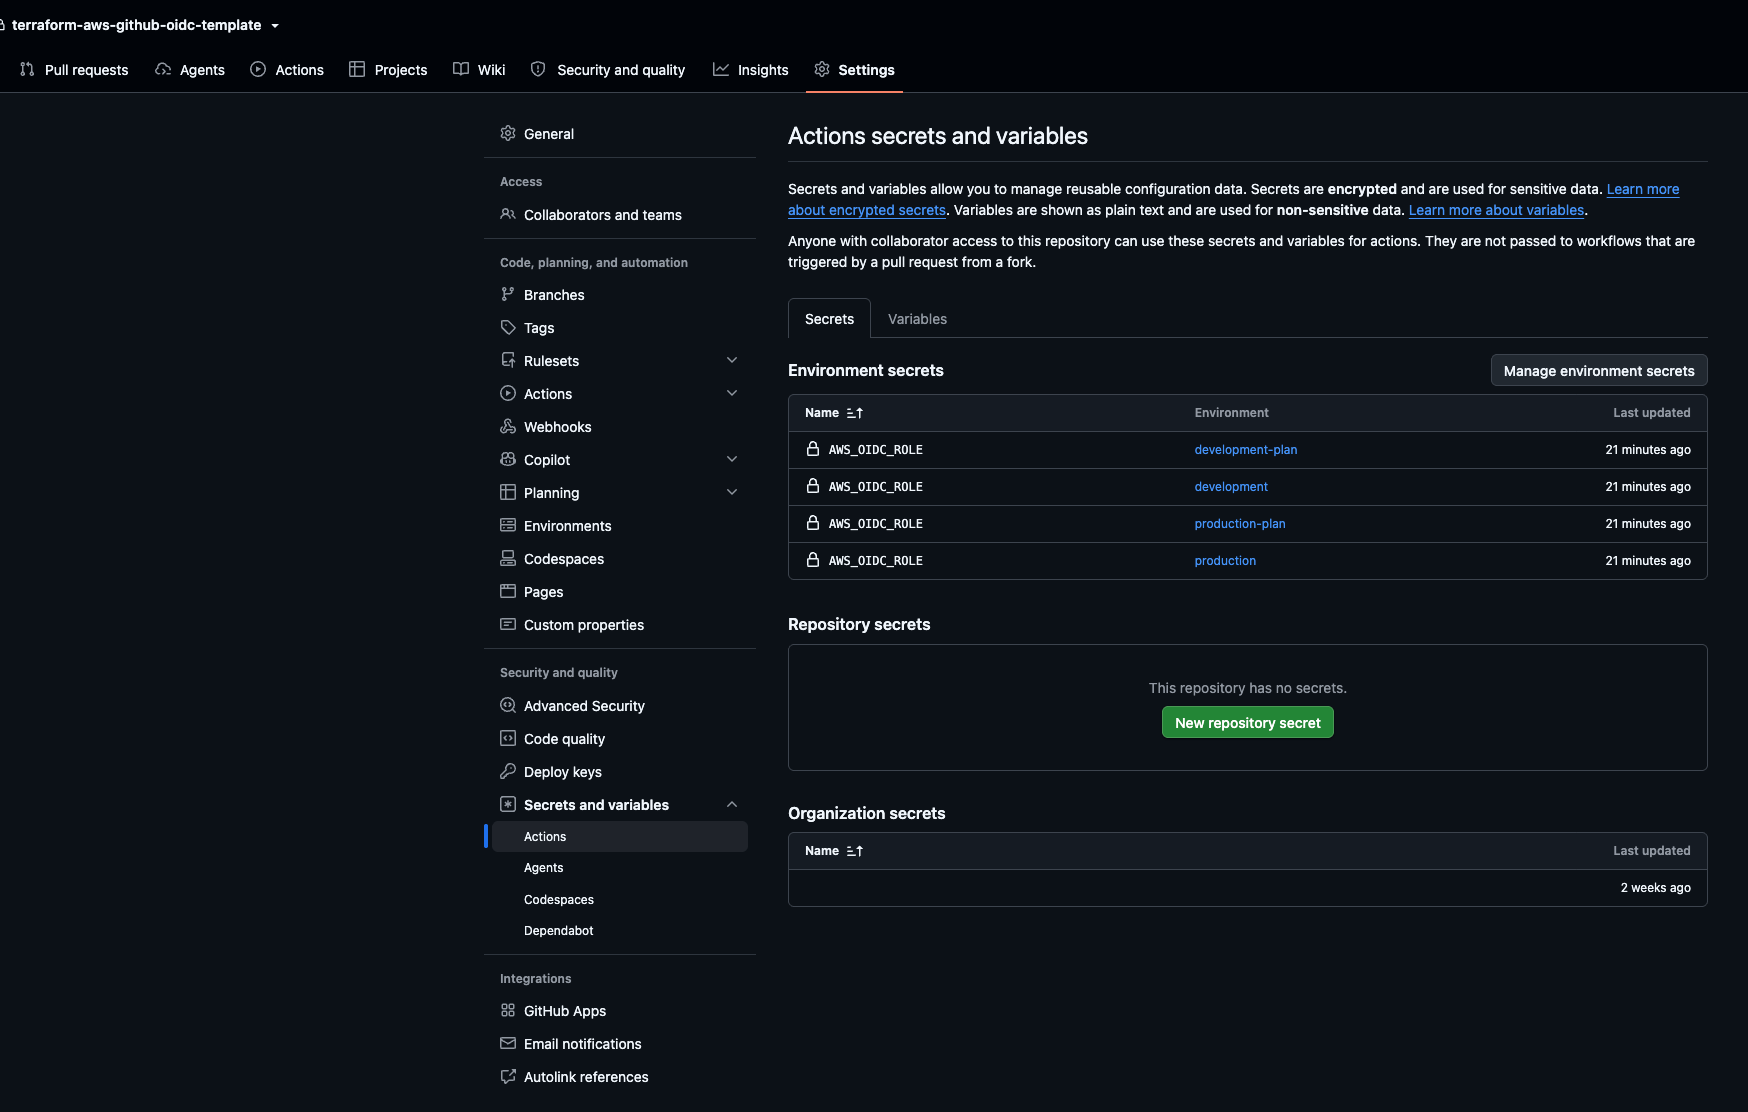
In your GitHub repository, go to Settings > Secrets and variables > Actions. This is where you configure environment variables for the pipeline.
Create the variable AWS_OIDC_ROLE in 4 environments: development-plan, development, production-plan, and production. The -plan environments use a read-only role — enough for terraform plan. The apply environments use a role with write permissions. This separation ensures that a compromised plan step cannot modify infrastructure.
In each environment, set the ARN of the IAM Role you created in the previous step. If you have separate development and production accounts, you will need to write a different ARN per environment.
Step 4: Add Terraform code and run the pipeline
Now add your Terraform code and a GitHub Actions workflow file. You can clone our template - terraform-aws-github-oidc-template which includes both. Adapt the Terraform code to your needs — in our example, we deploy an S3 bucket and a CloudFront distribution with a static site.
Your Terraform module needs three things configured: a provider (which cloud and region to target), a backend (where to store state remotely), and the resources you want to deploy. The backend stores your Terraform state in S3 with native locking enabled — no DynamoDB table required:
terraform {
  backend "s3" {
    bucket       = "your-terraform-state-bucket"
    key          = "terraform/production/terraform.tfstate"
    region       = "us-east-1"
    encrypt      = true
    use_lockfile = true
  }
}
The use_lockfile = true setting enables S3-native state locking. Only one apply can run at a time, preventing state corruption when multiple commits trigger concurrent pipelines. See the Terraform S3 backend documentation for all available options. Our template includes a working backend configuration per environment.
When you push a commit, GitHub Actions triggers automatically. In our template, terraform plan and terraform apply both run on commits to main and develop. The branch determines which environment is used — develop targets the development account, main targets production. terraform plan shows what will be created, modified, or destroyed. Review the plan before proceeding — you do not want to accidentally replace a production database. Note that some modifications force a destroy-and-recreate operation.
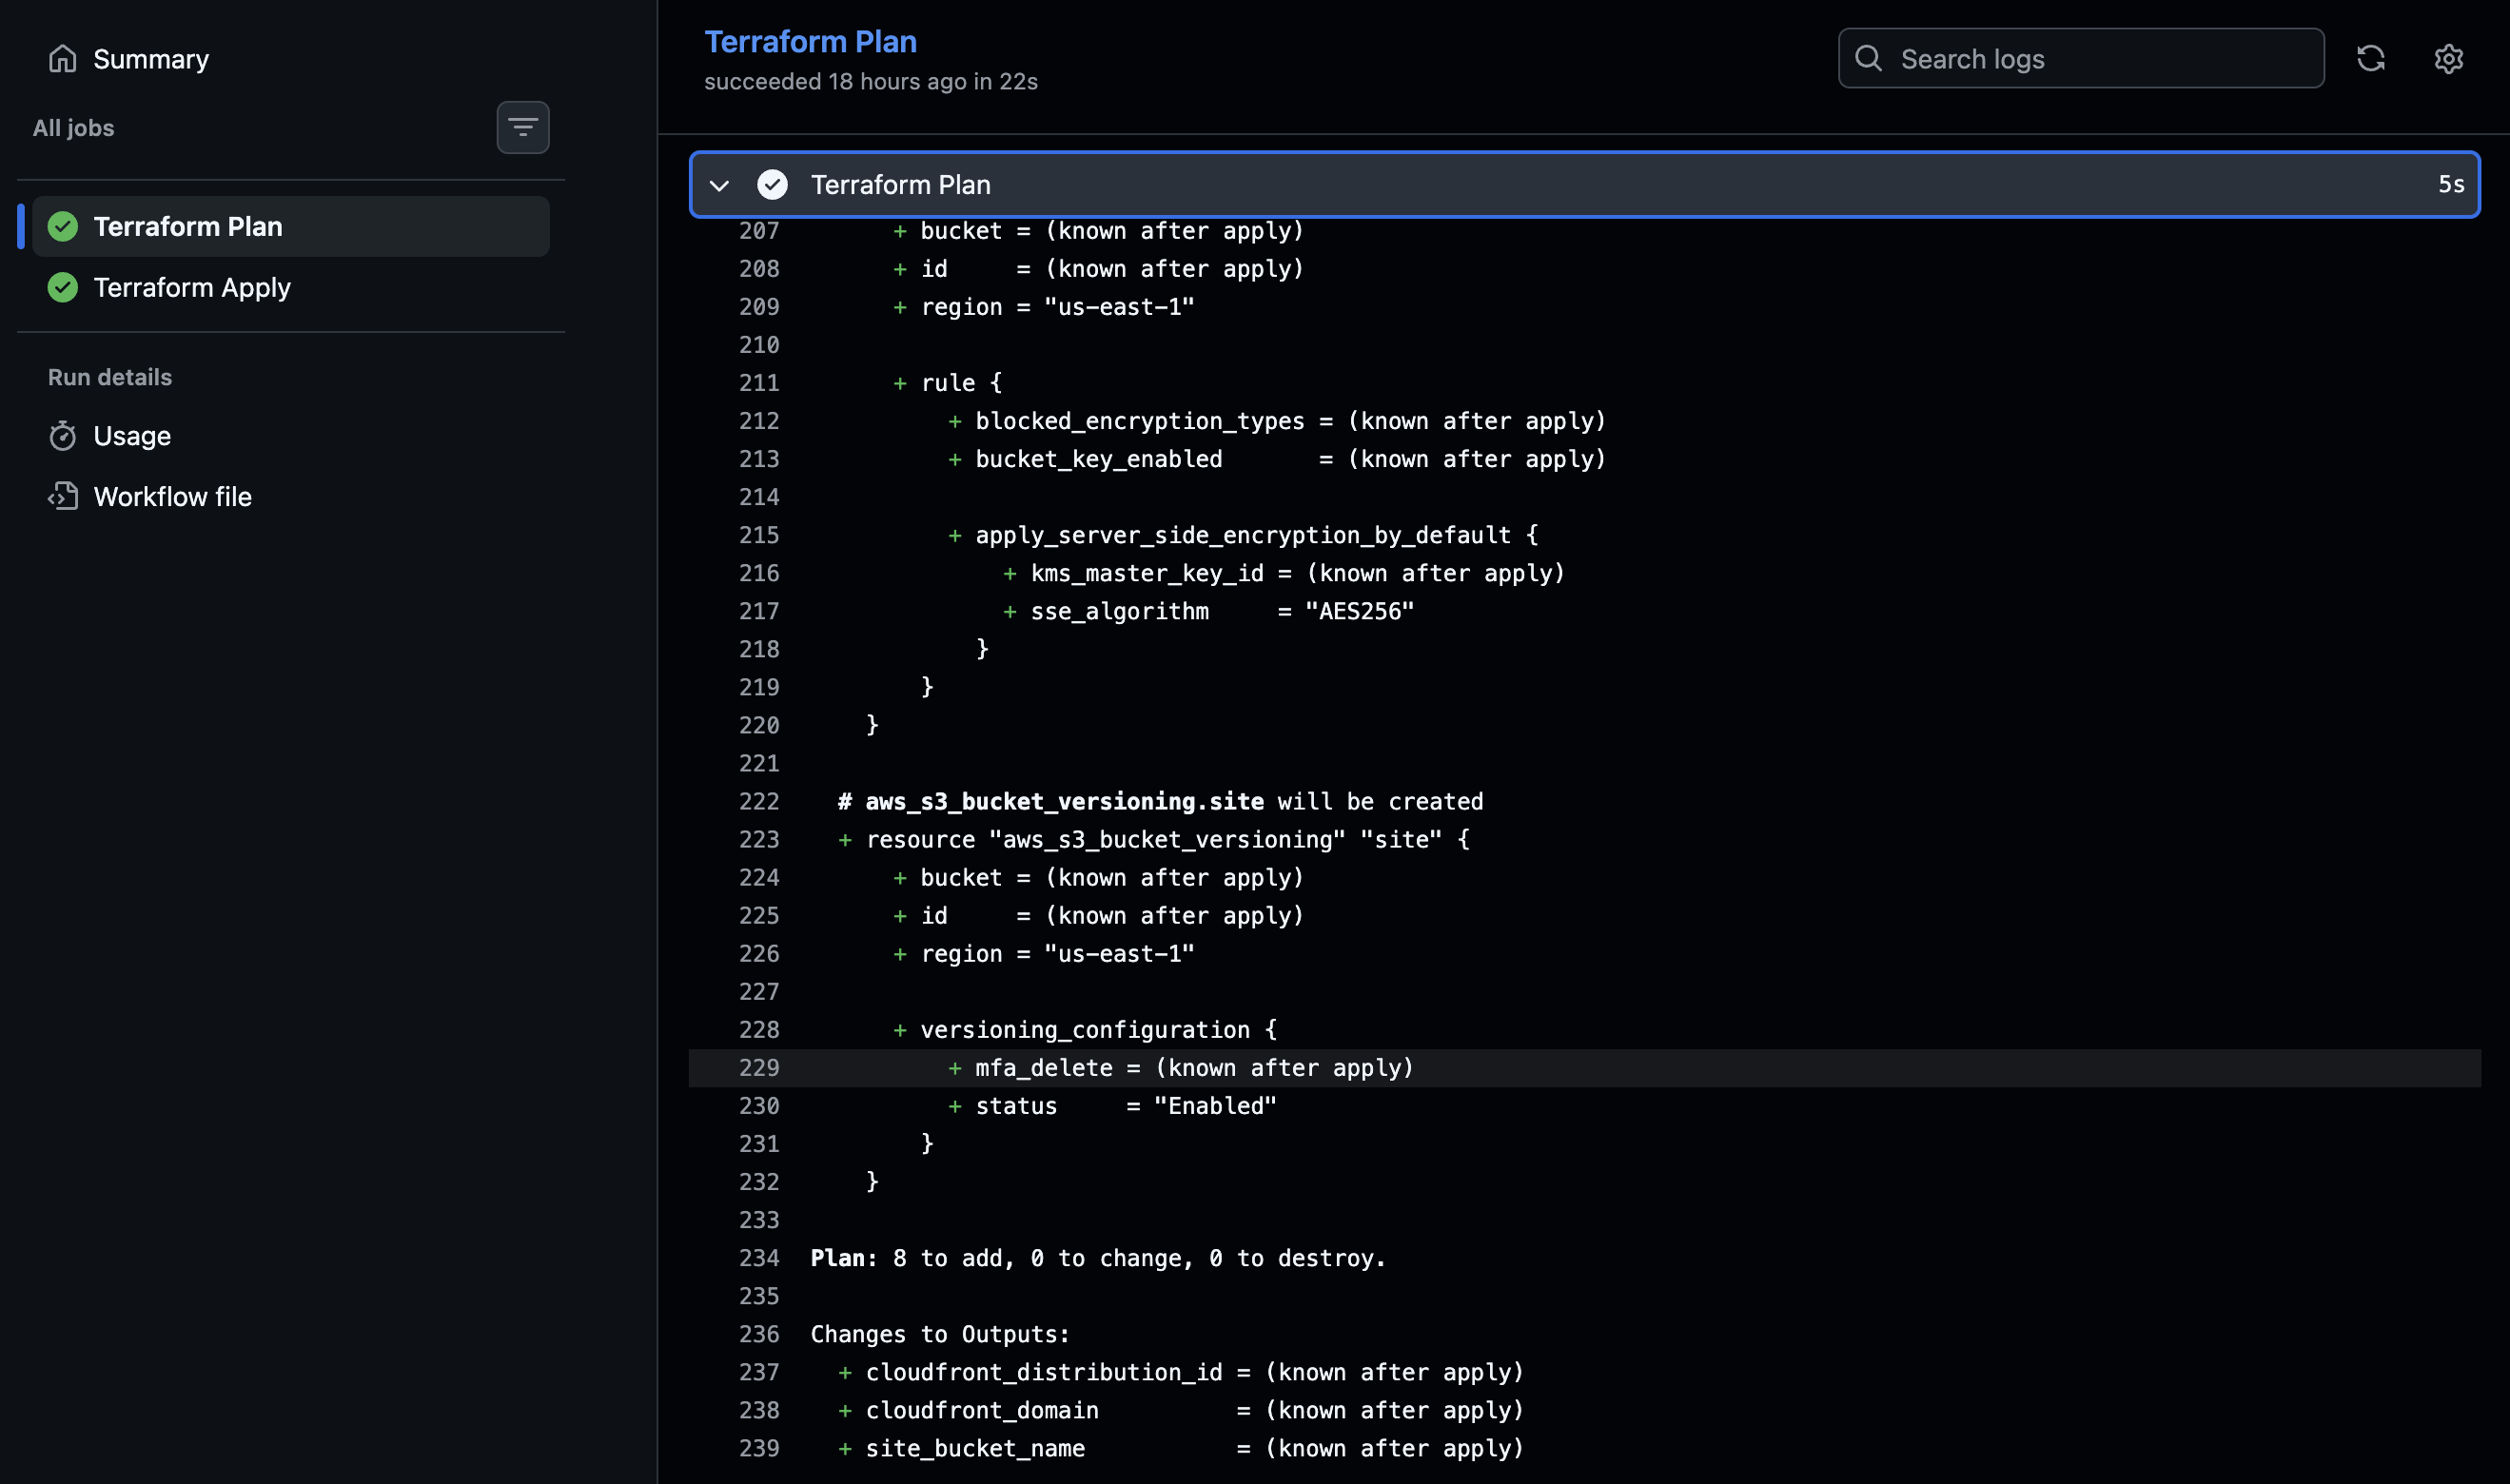
In the second stage, terraform apply executes the approved plan. Apply requires manual approval from a team member — configure required reviewers in the GitHub environment so no infrastructure changes happen without explicit sign-off.
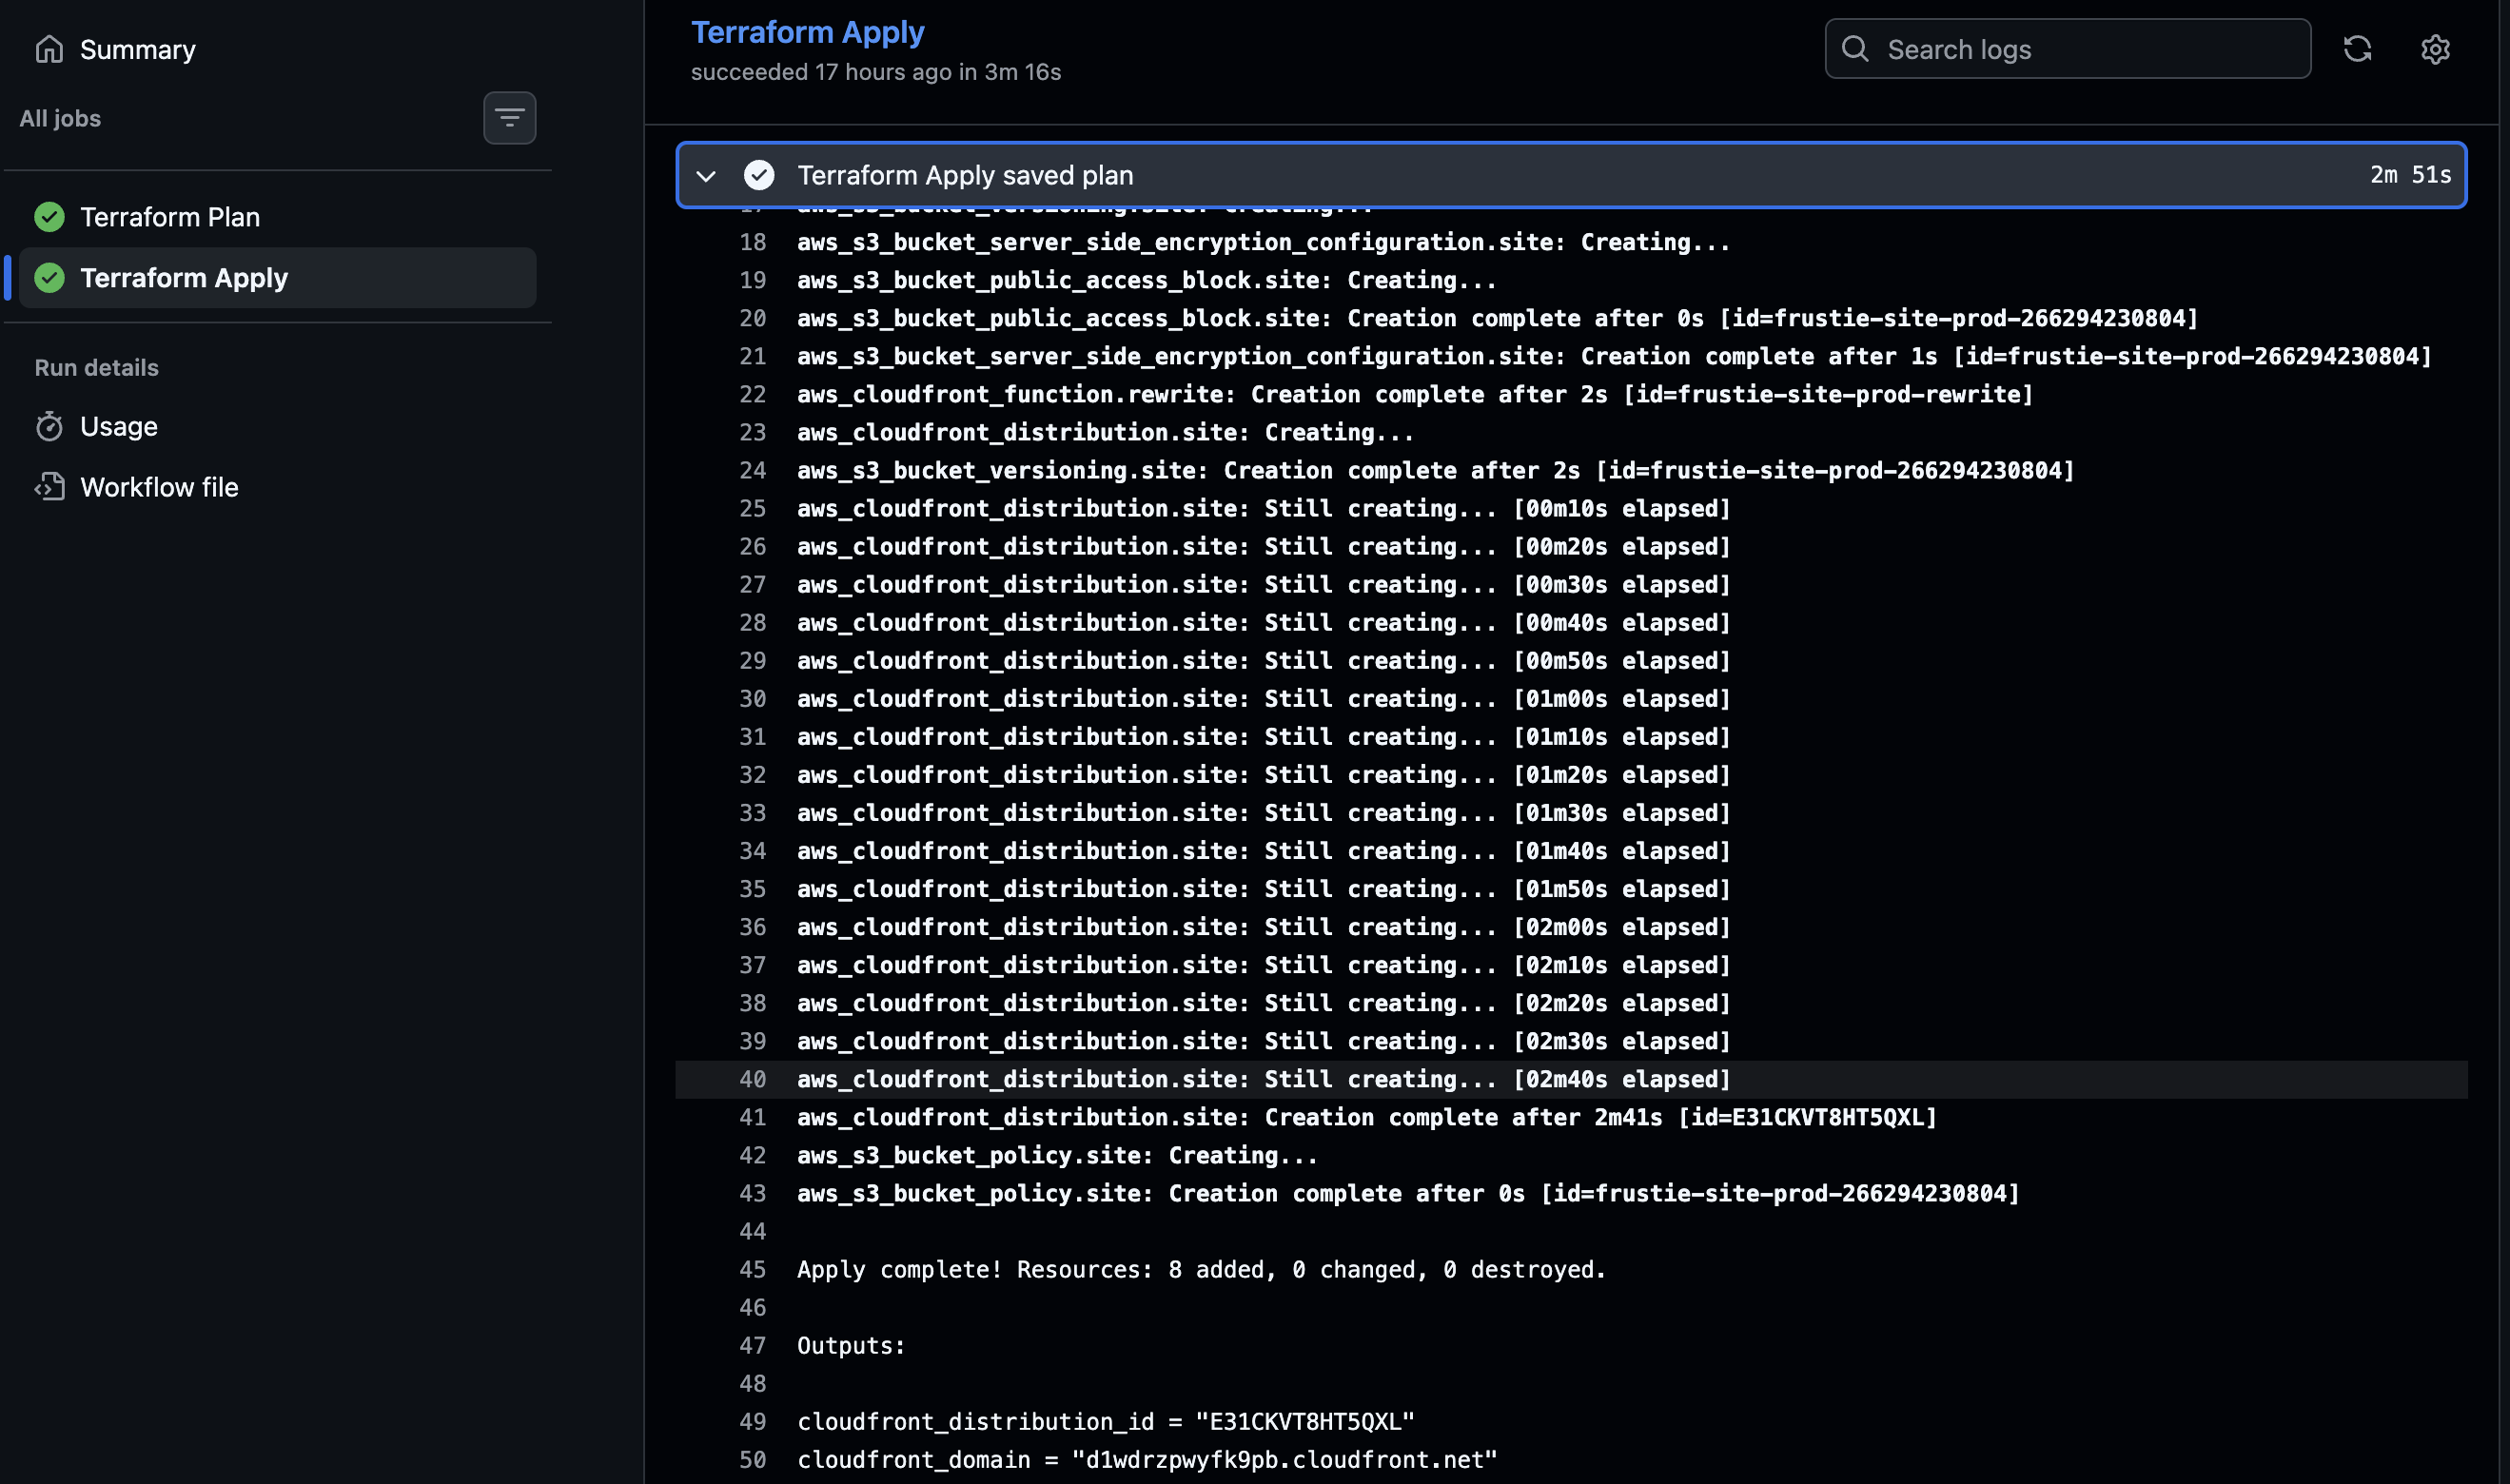
See a working run of this pipeline: example workflow run
Get started with Frust now
Limitations
This approach uses a single Terraform state per repository. Beyond approximately 50 resources or 3–4 distinct services, plan execution becomes slow and the blast radius of a single apply grows too large. At that point, consider splitting into multiple state files, using Terraform workspaces, or adopting Terragrunt with a DRY approach to manage multiple environments and services separately.
Agentic setup
This tutorial shows manual steps. If you use an AI coding agent (Kiro, Cursor, Claude Code, etc.), you can point it to our scaffold repository and it will set up this pipeline for you:
Repository: https://github.com/frust-cl/oidc-pipeline-scaffold
The repository contains structured instructions that agents can follow to:
- Ask you the right configuration questions (AWS account IDs, repo names, environments)
- Generate the trust policy and IAM role configuration
- Create the GitHub Actions workflow file
- Set up environment variables
- Generate the correct provider and backend combination for your target cloud
Give your agent the repository URL and ask it to initialize a Terraform pipeline for your project. It supports GitHub or GitLab as git providers, and AWS, GCP, or Azure as cloud targets.
Glossary
| Term | Definition |
|---|---|
| IAM (Identity and Access Management) | AWS service that controls who and what can act inside a cloud account. Permissions are assigned through policies attached to roles, users, or groups. |
| OIDC (OpenID Connect) | Authentication protocol that allows one service (GitHub) to prove its identity to another (AWS) using short-lived tokens. No stored secrets required. |
| Trust Policy | A JSON document attached to an IAM Role that defines which external entities (like a GitHub repository) can assume that role. |
| Terraform Plan | A preview of what Terraform will create, modify, or destroy. No changes are applied until a separate apply step runs. |
| Terraform State | A file that maps your declared infrastructure to real cloud resources. Stored remotely to enable team collaboration and locking. |
Sources
Get started with Frust now
Still have questions? Check the frequently asked questions.